1. First, login to the online portal with your admin account
You will then need to click the Manage Organization button at the top right of the page

2. Next, navigate to **Time Frames*”*

3. From there you will need to create a new time frame for the given holiday by clicking Add Time Frame

4. Give the specific time frame a name and then select the Specific dates or ranges button

From there, you will see a drop down – Specific dates or ranges where you can input the dates for when you’d like the time frame to take in effect
For our example, the office will be closed from July 4th, 2016 starting at 8:00 AM and back open during normal hours on Wednesday the 6th, 2016 at 8:00 AM
We will first need to begin the specific date/range on the 4th at 8:00 AM and end it at the end of the day which will be the 4th at 11:59PM
The way our system works you cannot simply add the range from the 4th to the 6th, you will need to do this day by day: See below screenshot

5. Next, click the green Plus sign to add another range

6. The second range should be specifically for 07/05/2016 12:00 AM through 07/05/2016 11:59 PM: See below screenshot

7. The third and final range should be from the start of the morning which will be 07/06/2016 12:00 AM to back to normal business hours which will be 07/06/2016 8:00 AM
- Once 8:00 AM hits on the 6th, this time frame will end and the answering rule will revert back to the specific business hour answering rule

8. Next, hit “*Save”*

We have now completed the creation of the holiday time frame.
The next thing we will need to do is add an answering rule to the main user on the domain that controls the call flow. Sometimes this is a receptionist user or sometimes this is a user that strictly forwards off calls to the correct destination depending on the time and day of the week. Please follow the instructions below:
1. Click Users to find the user we will need to add the answering rule to

2. Search for the user: in our example we will select the Office Manager User (1003) for training purposes
3. Click the Edit button and then select Answering rules

4. Click Add Rule

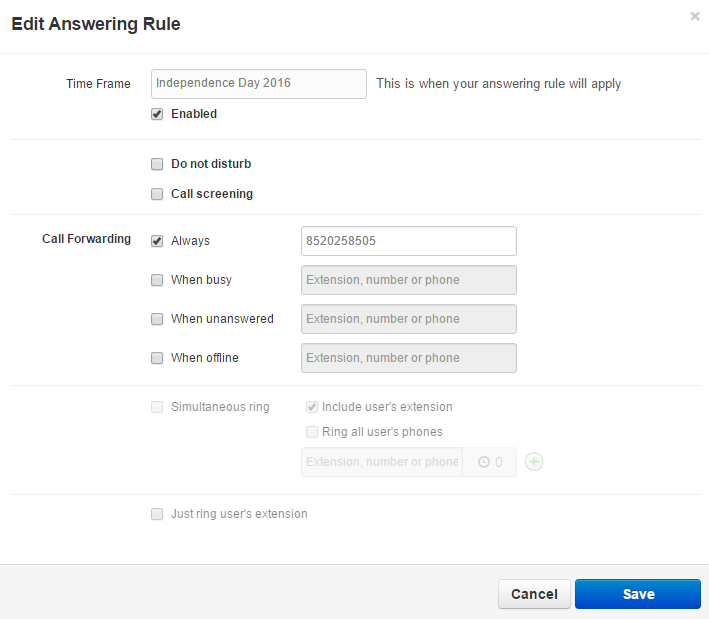
5. Next, select the time frame we created (Independence Day 2016) and then decide how you’d like the call flow to be during that time frame: In our example, we will simply forward Always off to an outside cell number then hit Save

6. Lastly, drag the time frame to the top: In our example, we have moved Independence Day 2016 to the top. Notice, there is an Active button next to the business-hours time-frame to indicate what the current call flow is doing. Once the time frame kicks in, the Active button will move up to the Independence Day 2016 time frame we created
Need more help with this?
Don’t hesitate to contact us here.


