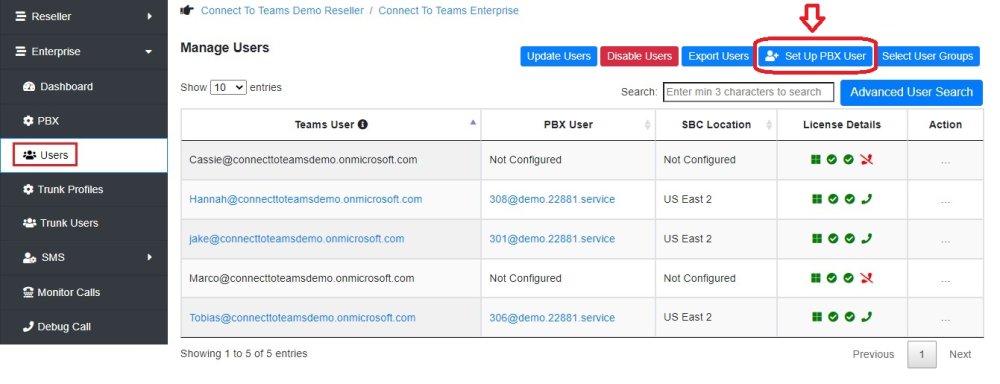
The Users list is populated via API directly from Microsoft to the Teams Connect portal. You can only activate a User after it has been synced from Microsoft.
With large Microsoft Tenants, the API may have trouble populating users. It is highly recommended to use Enterprise Group in Microsoft to ensure proper User Syncing:
- If all your desired Microsoft Users are already in Enterprise Groups, you may use those Groups.
- If they are not, you may create a new Enterprise Group in Microsoft and assign all desired Verve Teams Connect users to that group
- Click here, and follow the guide here to Select User Groups to sync the desired users.
Time: Usually 5 to 15 minutes, but sometimes 24 hours depending on Microsoft
Who: Microsoft Global Admin
- Once logged into the Provisioning Portal navigate to the Enterprise you wish to add a user to and then navigate to Users and click Set Up PBX User
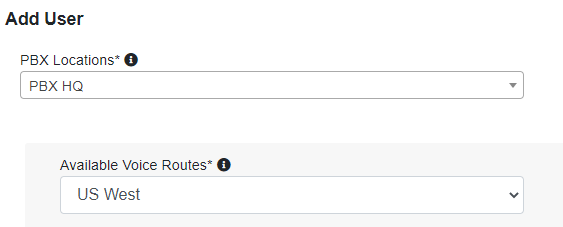
- From the dropdowns, select the relevant PBX Location
- A blue loading bar will appear below the dropdown – allow this to load and disappear before clicking anything else
- Select the desired location in Available Voice Route – US East or US West, depending on which is closer to the end user
- If you created one “Direct Route” there will be one option available, if you created two “Direct Routes” you can choose.
- Fill out the following information within the Add User section
- Teams User – Enter the persons email address
- The list contains Microsoft Office 365 users in the Organization/Tenant that have the Microsoft Phone System licensing in addition to their Microsoft User and do not have Microsoft Calling Plan.
- If their email address does not appear, assign the correct Microsoft licenses to them
- SIP User – Select the Verve User (or Extension) of that person from the dropdown menu
- Phone Number – Type in the User’s Extension Number here (this is preferable over phone number)
- Disable Voicemail in Teams if you plan to use voicemail within Verve.
- It is recommended that this is disabled unless the user will be primarily working within the Teams environment, otherwise ALL voicemails for that user will be answered and recorded in Teams.
- Teams User – Enter the persons email address
- In the User Devices section fill out the following information
- Enter c for the Suffix (if the “c” user already exists, simply click select)
- Enter a Randomly Generated Password for Password recommended 8 digits letters and numbers, no special characters
- Click Select and then click Add User
- Once the user is successfully added the Microsoft Global Administrator will receive an email confirmation telling them that the user has been provisioned successfully.
- If user is added by Verve, Client’s Global Administrator will need to log in and click ‘Sync users’ on the dashboard page to complete the process.
- The provisioning of a new user usually takes just a few minutes but can sometimes take longer to propagate in Microsoft servers. Once successfully registered, the User will appear with green icons indicating they are registered on the Enterprise Portal Dashboard.
Bulk Import
The bulk user import must be done by Verve, as there are certain tasks on the Verve Voice platform that the end user cannot complete.
To request a bulk upload, please provide a list of each user you would like activated to your Verve representative, including:
- Microsoft username (email address)
- Verve extension number
- Verve phone number
If adding users is done by Verve, the Client’s Global Administrator may need to log in and click ‘Sync users’ on the dashboard page to complete the process.
Need more help with this?
Don’t hesitate to contact us here.


