
- You can see who the active speaker is even in tile view by the blue outline around their video or icon.
- You can view if a user is sending audio, and the level of that audio, by the blue dots appearing on the side of their video or icon.
- You can see if the user is muted or has video turned off by the icons on the bottom left of video or icon.
- You can hover over the bandwidth icon in the top left of their video or icon to get more details on their current connection to the server. If a user is experiencing issues and their icon shows yellow or red, poor network connection may be to blame.
![]()
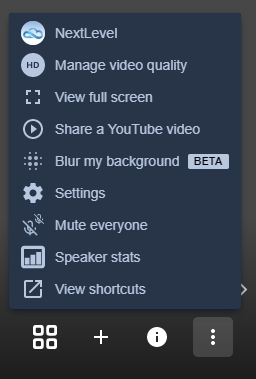
- Most meeting management (such as muting all participants) is done by clicking the 3 vertical dots menu option in the bottom right corner of the meeting.
- Manage video quality will set the maximum resolution for videos you see, decreasing bandwidth needs.
- View full screen allows you to hide the browser window and maximize the screen
- Share a YouTube video allows you to paste a video link to share directly.
- Sharing video will mute your audio, and unmuting your audio will mute the video.
- Blur my background allows you to blur the background of your camera. This increases your computer’s CPU usage, but reduces your bandwidth usage.
- Settings will access advanced settings such as choosing Microphone and Camera, or setting your name and login info.
- Speaker stats allows you to view how long each participant has spoken (and was considered the active speaker).
- View shortcuts lets you view a list of keyboard shortcuts for quickly accessing features.
![]()
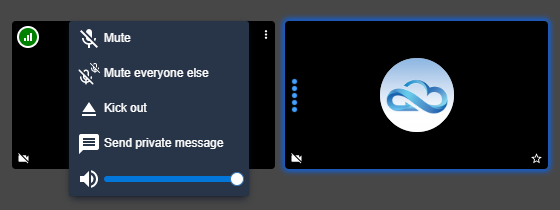
- You can manage an individual user by clicking the 3 vertical dots on their video or icon. This can be done in both Tile View and Active Speaker list-style view.
- Mute will mute that individual user. Note that mute does not work for dial-in users, and participants may unmute themselves.
- Mute everyone else will set all others to mute, easily allowing the user to become the active speaker.
- Kick out will remove the participant from the conference.
- Send private message allows you to send a private chat message to the user.
- You can access chat features by clicking the chat icon near the bottom left corner.
- Everyone can see chat messages by default.
- A private message will appear in red with the other user’s name.
- A red bar will appear across your chat screen indicating the message is private.
- Press the x on the red bar to return to public messages.
![]()
- A participant may raise their hand by clicking the hand icon near the bottom left.
- This will display a blue hand icon on their video or icon to indicate they would like to comment.

Need more help with this?
Don’t hesitate to contact us here.